Ezgo Rxv 48V Wiring Simplified :The Ezgo RXV 48 Volt Battery Wiring Diagram details the connection of batteries in series to achieve the required voltage. To obtain this diagram, consult the owner’s manual or contact Ezgo directly for accurate schematics.
In the realm of golf carts, the Ezgo RXV stands out for its reliability and electrical efficiency, powered by a series of batteries that collectively deliver 48 volts to the vehicle’s system. Understanding the battery wiring is crucial for both maintenance and troubleshooting.
A proper wiring diagram is indispensable for owners, technicians, and enthusiasts intent on performing any battery maintenance or replacement. The wiring diagram not only guides you through the process of connecting the batteries but also ensures you maintain the correct voltage and polarity throughout the system. This contributes to the cart’s overall performance and longevity, while safeguarding against electrical mishaps. To ensure your cart operates smoothly, always refer to the official wiring layout provided by Ezgo or seek assistance from certified professionals.
Ezgo Rxv 48V Wiring Simplified :Essential Components Of A 48v Wiring System
The essential components of a 48V wiring system are integral to the operation of the Ezgo Rxv. Understanding the battery pack is crucial, as it supplies the necessary power. Each cell within the battery pack must maintain proper voltage and connectivity.
Controller units play a pivotal role in managing the flow of electricity. They ensure efficient operation by regulating the motor’s speed and torque.
The solenoid acts as a high-current switch, critical for initiating the vehicle’s drive system. Its role cannot be underestimated, as it connects and disconnects the electrical current from the battery to the motor.
| Wire Color | Function |
|---|---|
| Red | Main positive |
| Black | Main negative |
| Blue | Key switch |
| Yellow | Acceleration input |
Step-by-step Guide To Wiring Your Ezgo Rxv
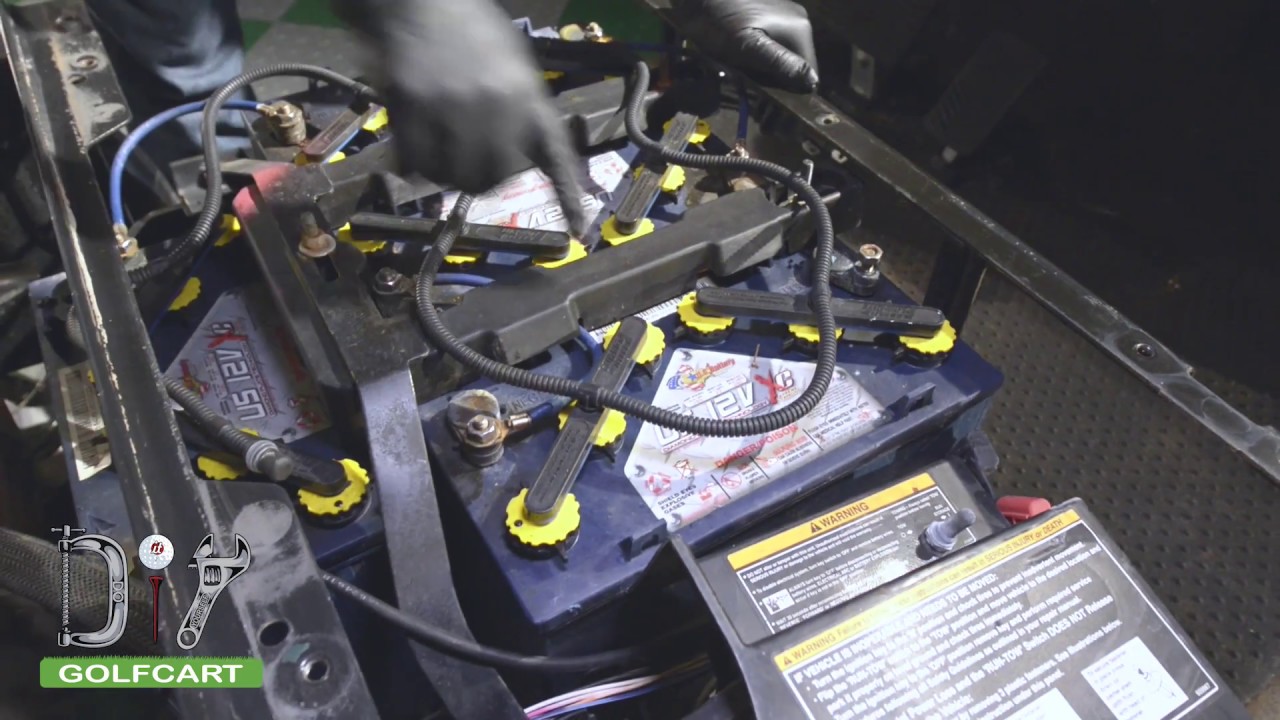
Embarking on the journey of wiring an Ezgo Rxv 48 Volt battery necessitates a systematic approach. First, gather all necessary tools and equipment, ensuring safety protocols are in place. This preparatory step sets the stage for a smooth installation process. Correct battery pack connection forms the backbone of the system. Ensure each battery is connected in series, which will provide the power essential for the EZGO RXV’s operation.
Moving on to the controller installation, carefully align the controller’s terminals with the corresponding cables. Secure connections promote an efficient electrical flow and prevent potential hazards. Simplify the solenoid wiring by following the diagram closely; this component acts as a crucial electrical switch in your golf cart’s circuit. Finally, connecting the motor and charger should be handled with precision. Assure that all connections are tight and double-check for accuracy to ensure your golf cart functions optimally and safely.
Troubleshooting Common Ezgo Rxv Wiring Issues
Troubleshooting common Ezgo Rxv wiring issues demands a systematic approach, especially when confronting diagnosing battery pack problems. Begin by inspecting the voltage levels across individual batteries within the pack. A multimeter can reveal discrepancies, indicating cells that may require replacement.
Controller glitches often stem from loose connections. It is crucial to check the wiring harnesses and terminals for secure attachment. Identifying corrosion is also part of the process, which, if found, must be cleaned to ensure optimal electrical flow.
Issues with the solenoid often present as a failure to actuate, leaving the vehicle inoperative. Addressing solenoid malfunctions includes testing coil continuity and verifying that the solenoid is receiving input voltage from the ignition switch.
When resolving motor wiring mishaps, it is vital to adhere to the Ezgo Rxv wiring schematic accurately. The connectivity of each lead should be double-checked against the diagram, ensuring no wires are crossed or improperly grounded.
Credit: m.youtube.com
Frequently Asked Questions Of Ezgo Rxv 48 Volt Battery Wiring Diagram An Easy Written Solution For You
What Is An Ezgo Rxv 48 Volt Wiring Diagram?
An Ezgo Rxv 48 Volt Wiring Diagram is a schematic representation. It illustrates the electrical connections and components of the Ezgo Rxv golf cart’s battery system. It provides a guide for assembling or troubleshooting the cart’s electrical system.
How To Wire Batteries In A 48 Volt Ezgo Rxv?
To wire batteries in a 48 Volt Ezgo Rxv, connect them in series. Link positive terminals of one battery to negative terminals of the next. Ensure appropriate voltage is achieved across the system. Refer to the specific wiring diagram for guidance.
Where Can I Find An Ezgo Rxv Wiring Diagram?
An Ezgo Rxv wiring diagram can be found in the golf cart’s user manual. It’s also available on the manufacturer’s website or through online forums and communities dedicated to Ezgo golf cart maintenance.
Can The Ezgo Rxv Run On Anything Besides 48 Volts?
The Ezgo Rxv is designed to run specifically on a 48-volt battery system. Utilizing a different voltage may lead to inefficient performance or damage to the electrical components of the golf cart.
Conclusion
Navigating the complexities of your Ezgo Rxv’s 48-volt battery wiring is now within reach. This guide aimed to simplify the process, delivering a straightforward solution. By following the outlined steps, you’re equipped to maintain your golf cart’s electrical system efficiently.
Embrace the journey to DIY mastery—your golf cart will thank you.