How To Make A Golf Ball: Simple DIY Guide
Make a golf ball by molding a rubber or synthetic core, adding cover layers, and finishing with dimples.
I’ve spent years learning the science and craft behind golf ball production. This guide explains how to make a golf ball from raw materials to the finished product. You’ll get clear steps, material choices, testing methods, and real tips from hands-on experience to help you understand the full process.

How golf balls are built: a clear overview
A golf ball has three main parts: the core, one or more layers, and the cover. Each part changes feel, spin, and distance. Knowing these parts helps you follow how to make a golf ball and why makers choose certain materials.
Materials and tools needed to make a golf ball
Basic materials and tools used in manufacturing and small-scale production include:
- Core materials
- Natural rubber compounds or synthetic rubber blends.
- Balancing agents and cross-linkers to control firmness.
- Layer materials
- Ionomer resins or thermoplastic elastomers for intermediate layers.
- Surlyn and urethane commonly used for performance layers.
- Cover materials
- Urethane for soft feel and spin control.
- Surlyn for durability and distance.
- Additives and finishes
- Pigments for color.
- Fillers for weight and density control.
- Tools and machines
- Core-forming molds or compression molding press.
- Injection molding machine for covers.
- Dimpling molds or CNC machines for dimple patterns.
- Curing ovens and quality testing rigs.
From personal experience, simple molds and a small press let you experiment at home, but industrial machines deliver consistent results for mass production.

Step-by-step manufacturing process
Below are the common steps manufacturers follow when they make a golf ball. I explain each step simply so you can see the full flow.
-
Design and specifications
- Choose core size, compression, and dimple pattern.
- Decide on single-piece, two-piece, or multi-layer construction.
-
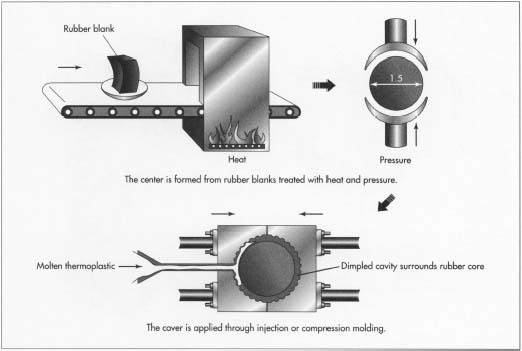
Core creation
- Mix rubber, fillers, and curing agents into a compound.
- Form cores by compression molding or casting.
- Cure cores in an oven to set shape and firmness.
- Check weight and diameter to match standards.
-
Layering (for multi-layer balls)
- Apply one or more mantle layers over the core.
- Use injection molding or compression molding.
- Layers tune launch angle, spin, and energy transfer.
-
Cover application
- Mold the cover from chosen material, usually urethane or ionomer.
- Use injection molding or two-piece compression molds.
- Ensure smooth seam lines before dimpling.
-
Dimpling and finishing
- Press dimple patterns into the cover while the material is warm or use a secondary molding step.
- Paint and mark the ball with logos and alignment marks.
- Apply clear coats for shine and protection.
-
Final curing and trimming
- Cure the finished ball to stabilize materials.
- Trim any flash and re-check seam quality.
-
Sorting and packaging
– Grade balls by compression and appearance.- Pack for retail or wholesale.
When I worked on small runs, dimpling and cover fit were the hardest parts. Precise molds and consistent temperatures are key to making a golf ball that performs well.
Quality control and testing
Quality control matters at every step when you make a golf ball. Common tests include:
- Diameter and weight checks using calipers and scales.
- Compression testing to measure feel and firmness.
- Flight testing with launch monitors for carry, spin, and launch angle.
- Durability testing by hitting balls repeatedly or using abrasion machines.
- Visual inspection for seams, paint defects, and dimple quality.
Manufacturers also maintain batch records for traceability. My advice: test small sample batches often. A tiny change in cure time or material mix can change ball performance.

Types of golf balls and how construction affects performance
Knowing types helps you decide how to make a golf ball for specific goals.
- Two-piece balls
- Core and cover only.
- Designed for distance and durability. Good for beginners.
- Three-piece and multi-layer balls
- Core, mantle, and cover layers.
- Offer more control, spin, and feel for skilled players.
- Soft-cover versus hard-cover
- Urethane covers feel softer and give more spin.
- Ionomer covers are harder and last longer.
When you make a golf ball, layer choice affects spin, launch, and shot shaping. I’ve seen small tweaks in core hardness change spin noticeably.
Can you make a golf ball at home? DIY tips and safety
You can experiment at home to make a golf ball prototype. Keep these tips in mind.
- Use safe materials and proper ventilation. Some resins emit fumes.
- Start with two-piece designs. They are simpler than multi-layer balls.
- Use silicone molds for small batches.
- Control temperature carefully during curing.
- Expect imperfect seams and variable performance.
From my DIY attempts, expect a learning curve. Simple homemade balls teach craft and science, but they won’t match factory consistency. Avoid hitting homemade balls with high-speed machines until you confirm they are safe and balanced.

Benefits and limitations when you make a golf ball
Benefits
- Full control over materials and feel.
- Ability to prototype new dimple patterns and cores.
- Learning about material science and aerodynamics.
Limitations
- High equipment cost for consistent results.
- Complex chemistry and safety considerations.
- Regulatory standards for competitive play require certification.
If you plan to sell, check local standards and testing requirements. For hobbyists, making a golf ball is a rewarding way to learn and to create personalized gear.

Frequently Asked Questions of how to make a golf ball
What materials are best for a golf ball core?
Most cores use natural or synthetic rubber blends with cross-linking agents. These blends control firmness and energy return.
How are dimples made on a golf ball?
Dimples are formed with molds or pressed into the cover during molding or a secondary pressing step. Dimple shape and pattern control lift and drag.
Is it legal to sell homemade golf balls?
You can sell homemade balls, but they must meet local regulations and safety standards for consumer products. Competitive play usually requires certified balls.
Can I make a golf ball that matches a pro’s ball?
Replicating pro-level performance is hard without industrial equipment and exact materials. Small workshops can get close on feel but rarely match full performance metrics.
How long does it take to make a golf ball in a small setup?
A single prototype ball can take a day including mixing, molding, curing, and finishing. Small batch runs are faster per ball but need setup time.
Do different dimple patterns change distance?
Yes. Dimple depth, diameter, and pattern change airflow and lift. Adjusting patterns can increase carry or lower wind sensitivity.
Conclusion
Making a golf ball combines simple parts with precise process control. Whether you’re a hobbyist or a small producer, focus on core chemistry, layer choice, and dimple design to reach your goals. Try small experiments, document each change, and test often to learn what works. If you found this guide helpful, try a prototype, leave a comment, or subscribe for more hands-on tips about golf gear and manufacturing.